Are You Ready for CCD Astrophotography?
Michael Purcell
Are you considering the plunge into CCD Astrophotography? There are many guides into the details of "how" to perform digital astrophotography. In this article, I would like to write a bit about what a typical evening of imaging is really "like". This will, I hope, give you some sense of what to expect -- especially during your first attempts.
My own foray into CCD imaging began in 1992 when I read Dennis di Cicco's S&T review of the SBIG ST-6 camera. ("SBIG" stands for Santa Barbara Instrument Group -- a major manufacturer of CCD cameras and guiders.) My first images were taken using the ST-6 and a used Meade LX5. I am now using an ST-7 with Meade's LX200. Although some of the details have changed, the basic imaging process remains the same. I am assuming that, like me, you do not have a permanently mounted scope or observatory, and that you have a fair amount of light pollution in your sky.
Like film-based astrophotography, CCD imaging is work, and requires practice. There are three areas that will require the most effort: alignment, finding, and focusing.
- Alignment: Good polar alignment is critical for tracking the object during the exposure, as well as for helping you to find the object in the first place. If your mount drive has Periodic Error Correction, that will also help.
- Finding: CCD chips are very small, with a correspondingly restricted field of view. The FOV of the ST-7 on my LX200 is only 9'x13'. It is not uncommon to slew to an object and have nothing show up in the first test image. Therefore, you should plan to have good star charts. I also make use of the "High Precision Pointing" feature of my LX200.
- Focusing: This is the bane of all imaging. There are several techniques, but all demand practice. CCD cameras require very precise focusing. The normal temperature changes that occur during the night will cause a focused camera to go out of focus as a result of contraction of the optical tube assembly.
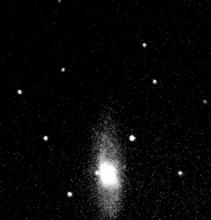
So, let's begin. You have assembled your scope, aligned it, and found a reasonable Messier object as your first target. M65, for example. You take some short test images as you center and focus the galaxy. You then try your first real image. That is what I did. The following is my very first image with the ST-6.

The most obvious flaw in my first image is the bright gray glow in the center. This is optical vignetting, which all telescopes have in one form or another. The way to remove this is to take a "flat field" image and then use your CCD software to process it. Two months later I took a Flat image and corrected the image. I also cropped the image so it looked less off center. See below.
�
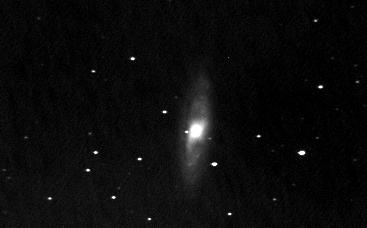
After I had more practice, another attempt in 1994 using the same equipment produced the following image:
�
�
The improvements in the last image resulted from:
- Creating a good Flat image.
- Better polar alignment.
- Better focus.
- Deeper image (10 minutes versus 1.5 minutes.)
My normal preparation for an evening of driveway imaging is as follows:
- Set up the scope before sunset.
- Attach the CCD camera and controlling PC.
- Take Flat images using the twilight sky.
- Wait for darkness. This is a good time to review the evening's target objects and their related star charts.
- Let the CCD chip stabilize its temperature at about 20 degrees C below ambient.
- Polar align the scope.
- Focus using a globular cluster, or any star field with medium bright stars.
- Double-check the polar alignment.
- Put everything away because the sky clouded over.
For your first images, I recommend that you stick with bright and easily found Messier objects. Globular clusters such as M3, M5, and M13 are ideal. Their brightness allows shorter images. This, in turn, reduces the effects of imperfections in your polar alignment and the scope's clock drive. They are also very useful every night as focusing targets. Bright stars are not good for focusing because they saturate the CCD pixels. When in focus, dimmer stars will cover only a few pixels. When out of focus, they will smear and sometimes be misshapen.
A word of warning to owners of SCT's: be sure to make your fine focus by turning the focuser such that the mirror is moving down toward the back of the tube assembly. Otherwise, the mirror will settle back a bit toward the bottom, ruining your focus. On the Meade SCT's this means you should turn the focus knob counter-clockwise. (Note: After I wrote the original article, I found documentation on the Internet indicating that my description of the mirror movement is backwards. Nevertheless, you still want to achieve final focus by turning the focuser counter-clockwise as I describe above. --MP) You should refocus anytime you slew more than 30o, or the temperature changes by more than 10 degrees C since the last time you focused.
When attempting to locate a dim object, always find a bright nearby object first. This is the technique employed in Meade's High Precision Pointing. When you have centered this first object be sure to check your setting circles, digital or otherwise. Then the short hop to your real target will have a very high probability of putting the object somewhere on the CCD chip. If not, then slow slewing in the area should find the target.
In addition to Flat images, you will also need to capture Dark images. Flat images are used to correct optical imperfections; Dark images are used to remove the background electronic noise created by the CCD itself. While a single Flat image can be used for an evening's work, in theory you will need to take a Dark image for every light image. The Dark image must be of the same temperature and duration as the corresponding light image. If your CCD has active temperature control, then it is possible to create a library of Dark images in advance. This is a very good use for cloudy nights! If your camera does not have this feature, then you will need to take Dark images before and after the light image, and use the average of the two when processing the image.
Unlike film, CCD detectors do not suffer from reciprocity failure. Therefore, the longer your exposure, the better the image. This will be very apparent with nebulae and galaxies. My typical exposures are 10 to 30 minutes. An image that is too short will be very "noisy" (grainy). This problem is evident in my first image.
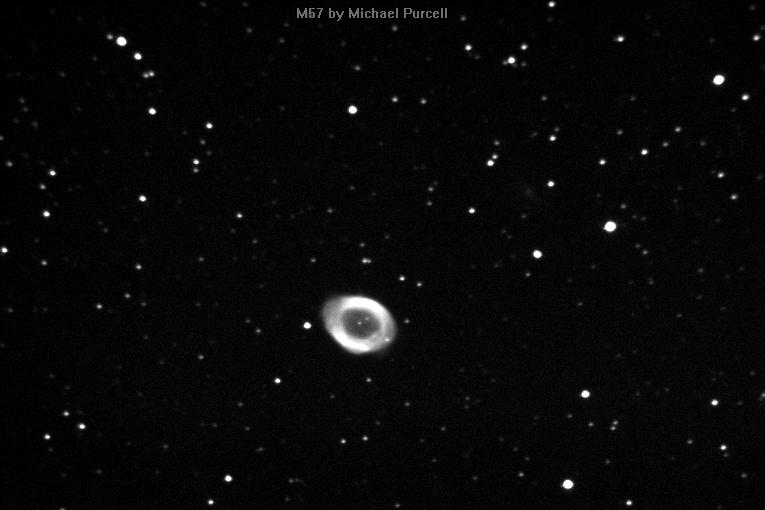
An ST-7 image of M57 is below for comparison with my first efforts. This is a 5 minute image taken from my driveway, and is the basis for my "formal" image.
�
�
So, having read all the above, what CCD camera should you buy? That depends greatly on your budget. High quality telescopes that are suitable for astrophotography are expensive. There is an equivalent range in quality and prices for CCD cameras. Key features to look for include:
- Temperature control
- Pixel "depth" of at least 12 bits.
- Support for either:
- Scope autoguiding, or
- guide star-based addition of multiple short images.
�There is a lot more that I have not included, including many of the image processing techniques needed to create a presentable image. However, I hope that this article has given you a sense for what to expect in your first imaging sessions.
Published in the March 1998 issue of the NightTimes


