Building a Flat Field Light Box
Ron Stanley
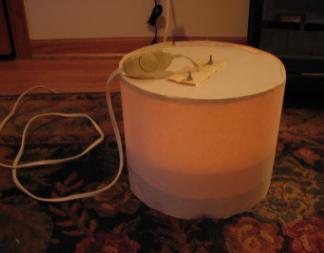
Last month I wrote about the importance of flat fields in imaging and this month I will detail how I built my light box for taking flat fields. Since I image from my back yard where the availability of power is not a problem I built mine to use AC current but a similar light box could be built using LED's and battery power.
The materials that are needed are a sheet of foam core board, about a foot of PVC tubing, a sheet of poster board, a 7.5 watt light bulb and fixture, some AC line cord and an in line dimmer switch, some clear drafting vellum, a hot glue gun and some tape.
First measure the outside diameter of the largest scope you plan to use with the light box. If you use a dew shield then measure the outside diameter of the dew shield. Add 4 inches to that diameter and cut a circle with that diameter from the foam core board. This will be the back of the light box. Next cut 2 more circles of the same diameter from the foam core board. Take these foam core circles and cut a center circle from each whose radius is one inch smaller than the overall radius so that when it is done you have two rings whose width is one inch and whose outside diameter is the same as the first circle cut from the foam core.
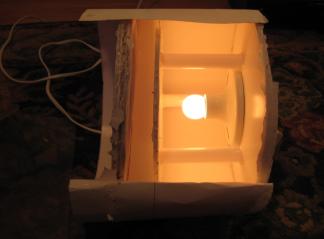
Take the first foam core circle and mount the light fixture to the center of it. I used small bolts and a piece of balsa wood on the back to reinforce the foam core. Cut the PVC tubing into 3, 4 inch pieces and glue them standing up on the foam core circle, these will be standoffs for the baffle. Take one of the smaller foam core circles that were cut from the center of one of the rings and glue this to the tops of the standoffs. This is the baffle.
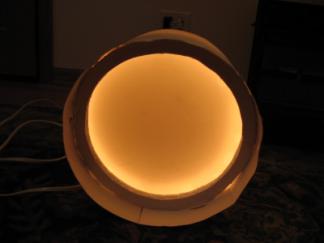
Next glue the 2 foam core rings together and then cover the opening of the rings by gluing the clear drafting vellum over one side. This is the diffuser. Now putting it together, take the poster board and draw a line about 6 inches and parallel with one of the long sides. Using the hot glue gun start attaching the poster board to the back of the light box and the diffuser ring using the back edge of the poster board for the back end of the light box and the line at 6 inches for the diffuser. Work all the way around the circles with the hot glue using a second sheet of poster board if needed. I use packing tape to cover the seams where the poster board meets.
The 7.5 watt light bulb is much too bright to be used at full power so find an in line dimmer switch to add to the cord. Usually I take flats at the end of the nights imaging and will point the scope at zenith and rest the light box on top. The aperture of the diffuser is a couple of inches larger than the scopes diameter because the most even illumination is away from the edges. The aperture of the diffuser is 8 inches on my light box and I use it with good results on my 7", 6" and 3.5" scopes.